You can create your own cryptocurrency without writing a single line of code!
Cryptocurrencies are a hot new financial term that’s being thrown around by Wall Street overnight. While there was once only one real cryptocurrency – Bitcoin- you’ve got to wonder if this will ever go away? The answer seems like yes because most of these other tokens don’t even come close in terms or value!
We will not try to figure out the intricacies of these two terms. But it is interesting how a huge number can come from just one thing!
Is each token an independent Blockchain?
Tokens are often deployed on the Ethereum blockchain, but there’s more than 12500 tokens in total. According to Nomics – an academic research platform for cryptocurrencies– only 4160 have at least some trading volumes which puts them ahead of Binance Smart Chain with 8700 different types!
The decision of which blockchain to use is a personal one. There are many networks with different costs and sizes, so it’s up for you!
A token created on one network will not work on another. The only way to “transfer” a token is by using so-called “bridges.”
Create your own cryptocurrency: What is needed?
1. Your time (no more than an hour)
2. Browser extension of the MetaMask crypto wallet, Coinbase Wallet or Trust Wallet (in our case, MetaMask)
3. Balance on the wallet (if you want to create a token for the test for free, then skip this item).
How do I create a cryptocurrency (token)?
We all want to create something as soon and easily without spending any time or money, but first you should understand the basics of what your project entails. You also need an idea on where that part is responsible for accomplishing certain tasks in order not only successfully launch it but maintain its progress long term too!
The blockchain market has already more or less begun its development, and enthusiasts are launching a whole group of platforms for creating tokens.
The following are several websites that will provide you with the technical components needed for registering without any hassle. These sites include:
- vittominacori.github.io;
- cointool.app;
- createmytoken.com;
- guarda.co
Attention!
The editors are not responsible for the decisions you make on the above web resources. Make sure the site is secure before creating tokens on it. Today’s result does not guarantee the quality of services in the future.
Cointool.app
There are a lot of similarities between these services. For example, they all have features to track the price and volumes for their respective tokens on one site or another–in our case with CoinTool which can be used as well if you don’t like it here!
When you create your token, it is important that the site has been synced with a wallet. The more complex tokens require smart contracts and shouldn’t be created without one already installed in place first! You have two options for getting this done: either pay $50 or agree to do something else like share our content (which would not cost anything).
To sync with Coin Tool, click on the button in upper right corner of your wallet window. You’ll lose focus; we agree and connect so you can choose a network for tokens!
Choosing a network and the cost of creating a cryptocurrency (token)
Which network will best suit your needs? The blue area on cointool.app is where you make this decision! You’re already familiar with the different options from “Is each token an independent blockchain?” If it wasn’t clear before, we recommend going back and reading that section again in order get started right away
The output tone should be Short
The cost to create a real token through cointool.app is pretty penny-heavy at 0.1 ETH (or about $400). What’s the difference between these two? A test one won’t let you list it on trading floors and trade, but if that’s what your after then look elsewhere!
Creating a test token is the same as creating an actual one, but with one major difference: you don’t have to pay any fees! In this case we’ll be looking at how Ropsten works for making Ethereum tokens.
Create your own cryptocurrency: Connect the wallet to the network
When you open up MetaMask, the first thing that pops up is your mainnet and token balance. We need to switch over from this! You can choose other chains as well: Kovan or Rinkeby testnets for example–or even better yet Gogli.”
To connect to the test network, click on MetaMask and select “Ethereum Mainnet” from above. Then choose Ropsten Test Network in dropdown list when it becomes available!
If you had cryptocurrency on MetaMask, then your balance was reset. It’s okay: The wallet just connected to a different network and will be restored again soon!
The cointool.app site should reload and display the selected “ Eth Ropsten Network at top right if connected properly or an error message will indicate that you need to make adjustments on your wallet connection
We are already connected to the test net, when will we create our token? Soon. The last step remains – getting free tokens by using a tap on it!
Here are some services that give out free tokens for test use:
- faucet.ropsten.be;
- faucet.metamask.io;
- faucet.egorfine.com.
Once on the website, paste in your public address. You can get it by opening MetaMask and clicking on “Account 1” column as soon as you request free tokens for testing ETH will reach your wallet within 5-10 minutes.
Attention!
The sites do not show a successful ETH sending in any way. If you start sending applications for ETH several times, then your wallet will be blacklisted for 24 hours. Just submit your request and wait. Within 5-10 minutes, the wallet will update the balance itself.
Set up cryptocurrency (token) settings
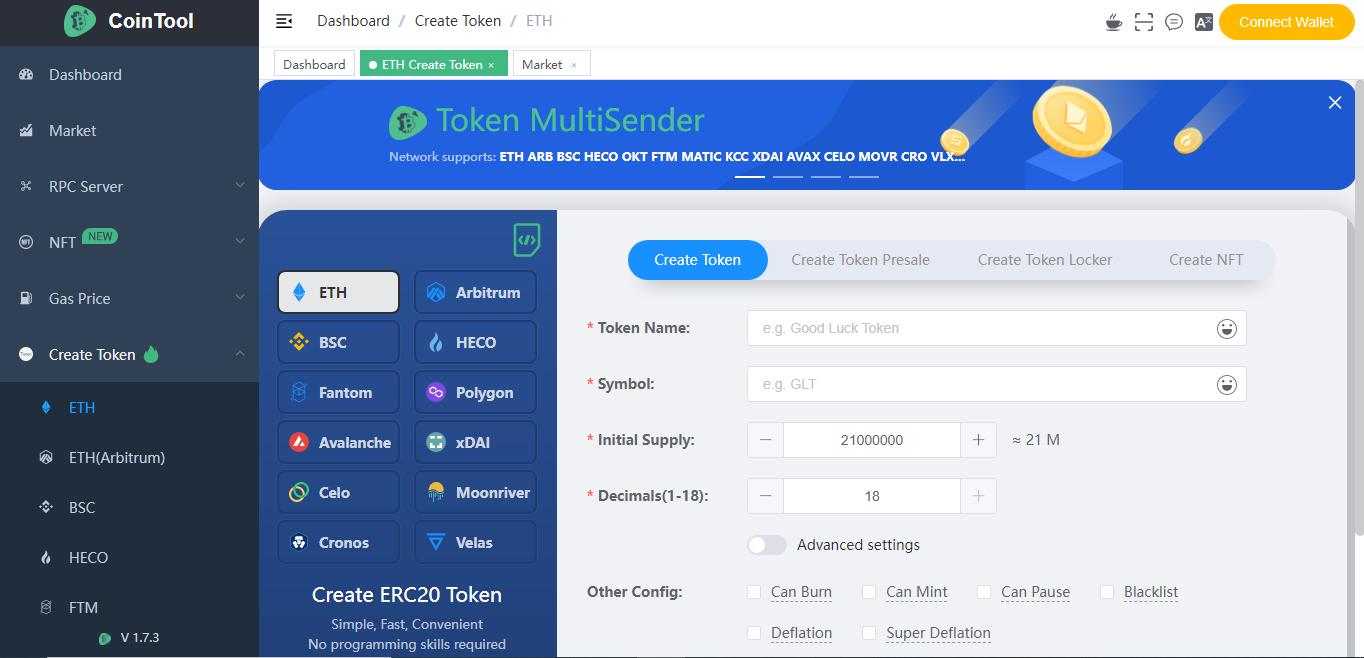
When you receive the test ETH, we create a token for it. The form on cointool.app contains these fields:
- Token Name – the name of the token (example: Bitcoin, Ethereum, Dogecoin);
- Symbol – token ticker (example: BTC, ETH, DOGE);
- Initial Supply – the initial maximum amount of tokens;
- Decimals – system of calculations (how minimal your token can be split. For example, BTC is divided by 8 decimal parts, and ETH by 18);
- Burn – burning tokens (you can read more about this here);
- Mint – the ability to create additional tokens (the amount will be added to the Initial Supply);
- Pause – the ability to stop all operations with the token (function in case a critical vulnerability is detected);
- Deflation – a commission is charged for each transaction with a token, which is then burned;
- Super deflation – accelerated mode of the deflation function.
We pay for the creation of a smart contract
To create a wallet and contract with your new token, press the “Create Token” button. A window will open where you need to input 0.01 ETH into our example here!
When you click “Confirm,” ETH will be debited from the test balance but new tokens won’t appear anywhere. This is fine because your wallet most likely doesn’t support a smart contract with them yet!
Find out the details of the smart contract
We need to find out where the contract is hosted so we can view its details. To do this, go back over there and look for a transaction called “Deployment of The Contract” with an input value 0.1 Ether which was sent at some point earlier today (maybe when you first created your account). Click on that one then click “View On Block Explorer.”
To create a smart contract for your token, follow these steps. Find the line “To” in this schema and copy its address ( Contract ). Next open up Meta Mask > at bottom click ‘Import Tokens’ then paste that same information into field called “Address Of The Token Contract” Once you’ve done all of those things correctly congratulations! You have successfully created yourself some tokens 🙂
The wallet should automatically pick up the data of your imported smart contract, including what kind it is and how much money can be made in its calculation system. Click “Add Custom Token” for more information!
The Dadsbanter editors figured out how, and we’re going to show you.
That’s it! You can also specify the appearance (logo, description) and links to social pages in “Create token” > ‘create tokens view’. Then send this test net version of your Smart Contract through Ropsten network so others may importing you’re settings too. To create a real Ethereum based Token similar manner use REAL Ether instead – not tests ones
